Article and process written by Fr. D.H.V., Sr. Meredith & APEP Oasis (Melbourne)
“A glass case stood in the distance, too far off for its contents to be recognized.
– The Temple of Solomon the King (Equinox Vol. 1, VII)
But [Rose Kelly] recognised it! ‘There,’ she cried, ‘There he is!’
“Fra. P. advanced to the case. There was the image of Horus in the form of Ra Hoor Khuit
painted upon a wooden stele of the 26th dynasty – and the exhibit bore the number 666!”
In early 2026 e.v., members of APEP Oasis embarked on a mission to recreate, as closely as possible, the Stele of Revealing in a blank, ‘paintable’ template form. For us, this was an act of contemplation, spiritual meditation, and fundraising; we believe there is great value in creating your own magical weapons, and with a performance of the Gnostic Mass on the horizon, we knew we wanted one of our own copies on the super-altar.
It was an extremely rewarding – if time-consuming – experience, and we now share our process with the reader so curious magicians, OTO members and rogue Egyptologists (I know you’re out there!) can fashion their own.
The Stele of Revealing: A Short History
The Stele of Revealing (also called Stele of Ankh-f-n-Khonsu) is a painted wooden offering stele, originally discovered in 1858 by French Egyptologist François Auguste Ferdinand Mariette at the mortuary temple of Pharaoh Hatshepsut, Egypt’s first woman pharaoh and a woman essentially erased from history by successive pharaohs. (They even chiselled her image from the walls.) It was found in Deir el-Bahari, a complex of tombs and temples on the West Bank of the Nile, opposite modern-day Luxor and close to the Valley of the Kings.
It was originally made for the priest Ankh-f-n-Khonsu, a priest of Montu – a falcon god of war, considered the embodiment of the ‘conquering vitality’ of Pharaoh and originally closely associated with the scorching midday sun and Ra. The Stele was discovered near his coffin ensemble and dates to the late 25th (or early 26th) Dynasty – approximately 680–70 BCE.
Originally located in the Boulaq Museum (now closed) under inventory number 666, the stele was moved around 1902 to the newly opened Egyptian Museum of Cairo (inventory number A 9422), where it remained until it was recently moved to the newly opened Grand Egyptian Museum, next to the Pyramids of Giza, where it is now fittingly located in Gallery 11, among the steles of his siblings – not unlike the OTO, Ankh-f-n-Khonsu’s family was one of priests and scribes.
It was designed to secure eternal life for the priest. Aleister Crowley and his fiancée, Rose Kelly, would, over two thousand years later, stumble upon it, which would kick off the Cairo Working, the reception of Liber AL vel Legis (The Book of the Law), and the ushering in of the Aeon of Horus. Crowley, as the reincarnation of Ankh-f-n-Khonsu, was the living prophet of this new Aeon.
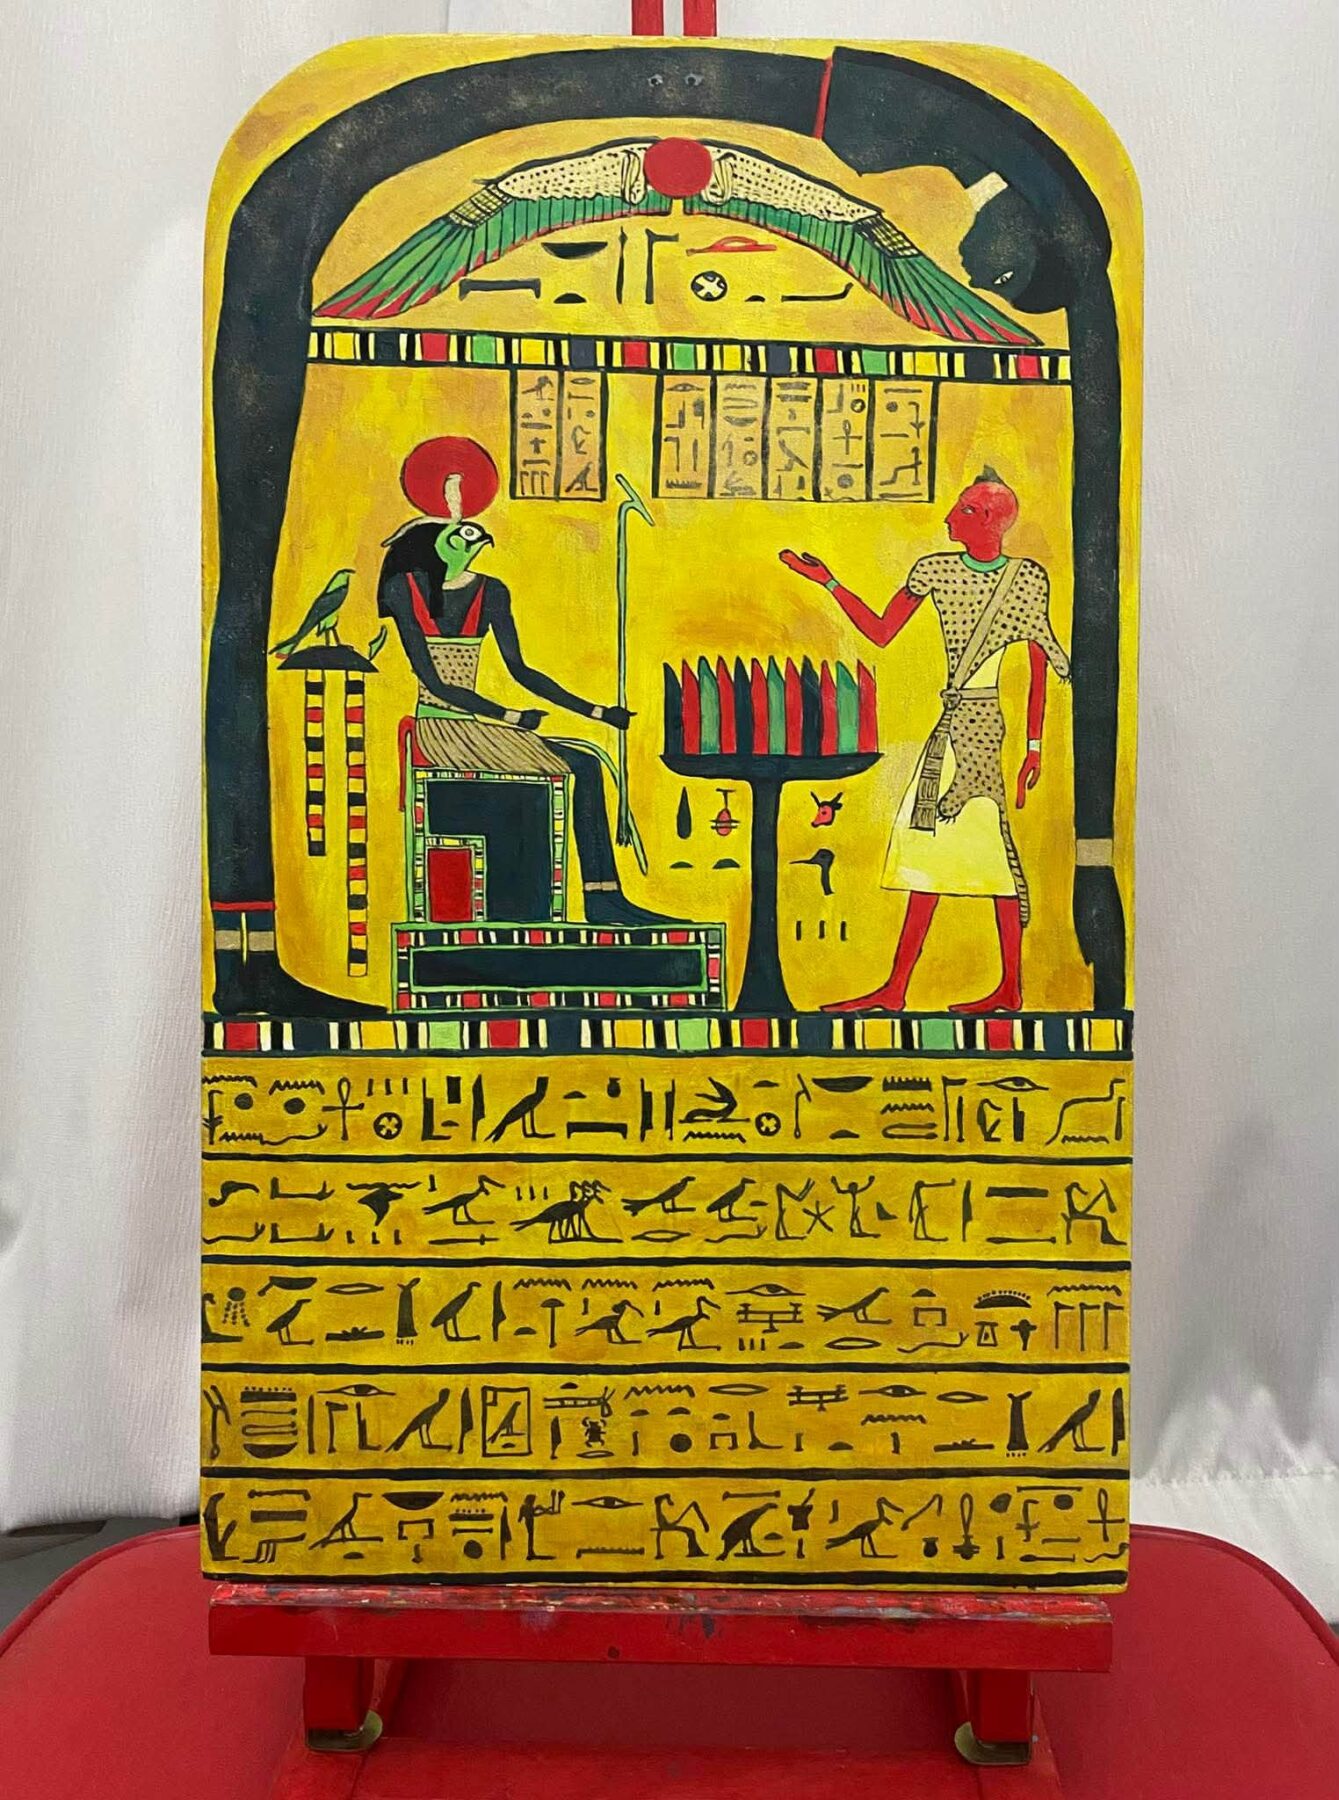
The stele depicts the three chief narrators in the Book of the Law: Nuit, Hadit, and Ra-Hoor-Khuit.
Why Make Your Own Stele of Revealing?
The Stele of Revealing holds special significance in Thelema, where it is a central element of many rites and a desired object for every serious magician.
It is required for the performance of the Gnostic Mass (as per Liber XV):
“Above it is the super-altar, at whose top is the Stele of Revealing in reproduction, with four candles on each side of it. Below the stele is a place for The Book of the Law, with six candles on each side of it. Below this again is the Holy Graal, with roses on each side of it. There is room in front of the Cup for the Paten. On each side beyond the roses are two great candles.”
— Liber XV
It is also mentioned in Liber AL vel Legis:
“Get the stele of revealing itself; set it in thy secret temple — and that temple is already aright disposed — & it shall be your Kiblah for ever. It shall not fade, but miraculous colour shall come back to it day after day. Close it in locked glass for a proof to the world.”
— Chapter III, verse 10
“That stele they shall call the Abomination of Desolation; count well its name, & it shall be to you as 718.”
Chapter III, verse 19
We wanted to make our own, and we wanted to make it as close as possible to the original.
Fortuitously, the original is made of wood (most steles of the time were carved of stone, including limestone, diorite, and, in the case of the famed Dream Stele at the Sphinx of Giza, granite, labouriously shipped two hundred kilometers north from the famed quarry at Aswan).
Properties of the Stele of Revealing
| Material | Wood |
| Height | 51.5cm |
| Width | 31cm |
| Thickness | 2cm (approx.) |
I’d had the pleasure of seeing the Stele of Revealing in person in January 2026 e.v., where I tried to surreptitiously confirm the above measurements without alerting my eagle-eyed Egyptologist guide; he would later tell me he agreed with Nikola Tesla’s assessment that the Pyramids of Giza were designed, in the ancient evenings of yesteryear, to function as massive, wireless power plants. Perhaps I needn’t have worried.
How We Made The Stele of Revealing
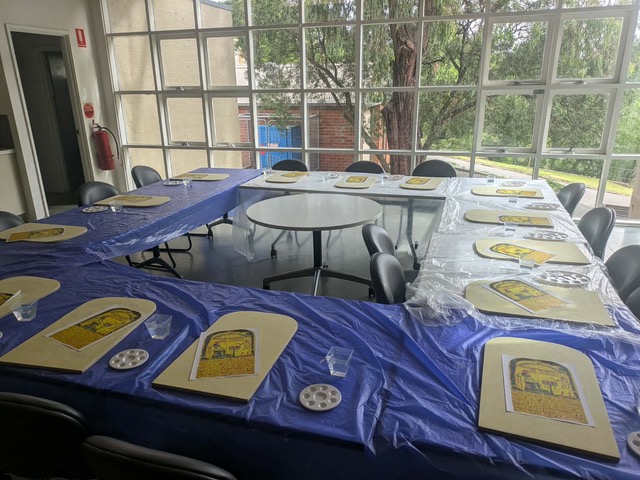
Please note that we tested the process on a single stele first to confirm it would work before committing to a full production run of 27 steles.
Step 1: Printing
We received the design files and had them printed at Officeworks, a local Australian print chain, in A2 format. (Officeworks calls this ‘plan’ printing.) We were graciously given the stele images, in black and white, by a fellow brother; you can access them here:
- Stele of Revealing A2 (obverse)
- Stele of Revealing A2 (reverse)
One reverse side, one obverse side. Officeworks charged us approximately $3.50 per side. Using scissors, we then cut each print down to size.
Step 2: Cutting the Boards
We purchased two sheets of marine plywood, each sized 2440 mm × 1220 mm (thickness 12mm) from Bunnings, a local hardware chain.
The original stele has a thickness of approximately 20 mm (2 cm), substantially thicker than 12 mm (1.2 cm); thicker plywood was considerably more expensive, and to keep costs in line, we opted to go for a slightly thinner end product. The steles were still sturdy enough for ritual and personal use.
From these, we cut 27 steles using an electric saw, at a total cost of approximately $200 ($100 per sheet). If you’re making just one, a much smaller offcut of plywood will do; a piece around 600 mm x 400 mm would give you a comfortable margin for cutting and any slight adjustments without wasting material. (If you’re just cutting one, Bunnings should be able to cut this down for you at no additional cost).
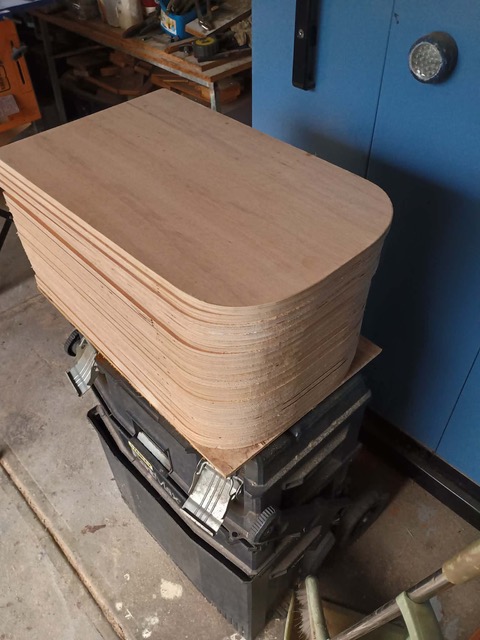
Some bleed (empty) space is desirable around the printed template. This makes it easier to ensure nothing is cut off; it’s hardly noticeable in the final product.
Step 3: Applying the Prints
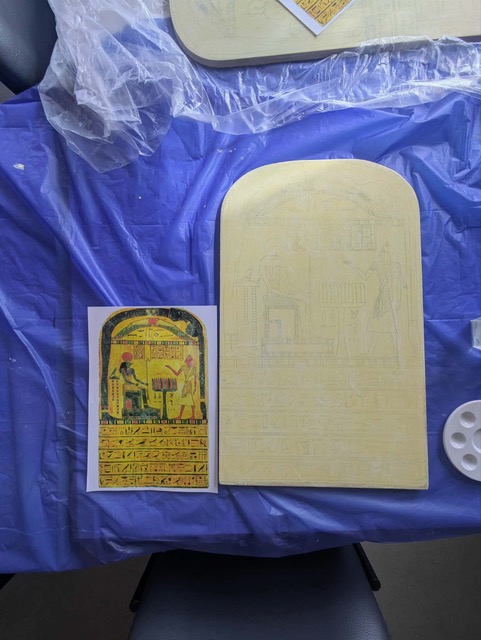
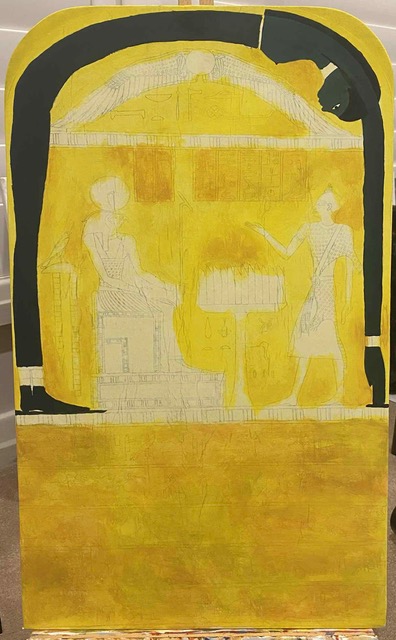
We made a simple gesso from craft glue and yellow paint. We glued the printed images to both sides of each stele – one side at a time, allowing each side to fully dry before proceeding – smoothing out bubbles with a credit card or similar before we let them dry.
We then covered the front with a light layer of gesso, followed by a second layer once the first had fully dried. This gave the surface the desired yellow, faded (antiquated) look.
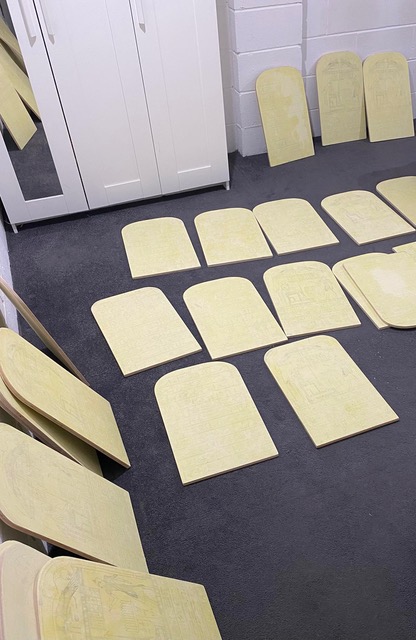
It’s important you use transparent gesso for this part of the process, which can be difficult and expensive to acquire. As Sr. Meredith astutely points out, it’s much easier to make yourself.
Sr. Meredith’s Transparent Gesso Recipe
| Plaster of Paris | 1 part |
| Clear PVA glue | 1 part |
| Water | 1 part |
We used about 700g of each and made litres – enough for 27 steles.
You need an airtight container to mix these in with a lid. Wear a dust mask and add the plaster to the water (not the other way around). You’ll need to mix for a while, possibly adding more water until you get a soupy consistency. You can add some paint to colour it; we added yellow acrylic paint by eye until it was a light yellow colour, but this isn’t necessary.
If you’re only making one, buying a small amount of translucent gesso may be cheaper.
For 27 steles, this took four members a full day’s worth of work. My sincere thanks to Sr. Meredith, Br. Mark, and Sr. Sky for their help with this process.
Step 4: Sanding Back
The printed images were now too faint beneath the gesso to paint over easily. The steles were now also too textured to paint on! Using an electric handheld sander, we painstakingly sanded each stele back until the image was clearly visible again.
Once applied, the gesso can be pretty gritty; without this step, we couldn’t have had smooth application of the paint.
Using an electric handheld sander, we painstakingly sanded each stele back until the image was clearly visible again. The final product had a vivid but worn image that was very pleasing to the eye.

Step 5: Painting
We gathered everyone together and painted. One enterprising (and talented) brother chose to ink his stele; many of us used acrylic paints, which bonded beautifully to the gessoed surface.

Results
The project was hugely beneficial for our local body. We charged $66 a stele and sold approximately 23. 17 members received the chance to paint their own Stele of Revealing; this generated considerable income for the Oasis in the process. It was a genuine act of fraternity, and I firmly believe every stele that left the room carried a little of that spirit with it.